
Digital Tide Mobile App
The mobile app lets you stay connected to your Cloud PBX even when you're away from your desk. With it, you can:
- make and receive calls using your Cloud PBX numbers;
- get push notifications for missed calls;
- use Contacts to quickly call customers and colleagues, and see the contact names on incoming calls;
- receive push notifications about missed calls and call back directly from the notifications;
- quickly change call forwarding settings and update your profile;
- listen to recordings of your conversations with customers and analyze call statistics.
Admins and managers can also:
- listen to all recorded customer calls to monitor staff performance;
- view statistics for all calls upon opening the app and promptly address any changes;
- configure Cloud PBX: adjust call distribution logic, add users, etc.;
- manage Cloud PBX expenses.
Download it on App Store and Google Play.
How to log in
To log in, use the same username and password you use for your Cloud PBX account. For example: anna_k@pbx12345.com

How to Quickly See Today’s Missed Calls
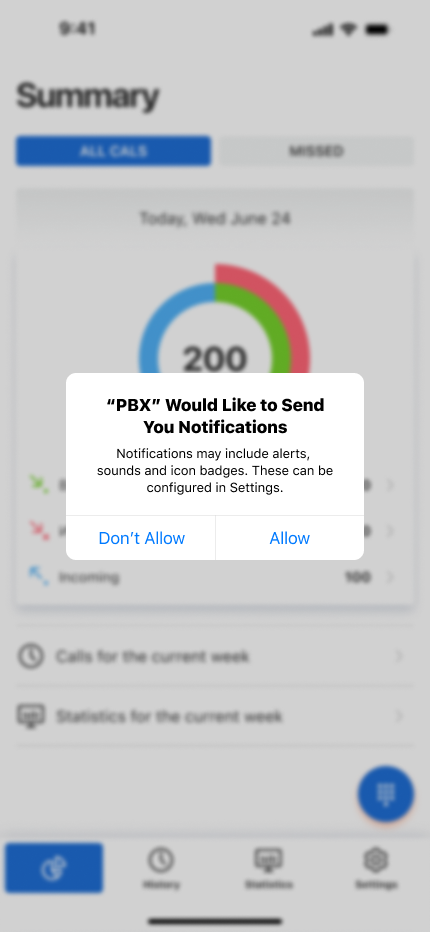
In the Summary section, you can see today’s key call metrics at a glance and respond quickly if something seems off — like a high number of missed calls.
You can also monitor how efficiently staff are handling missed calls by switching to the Missed tab.
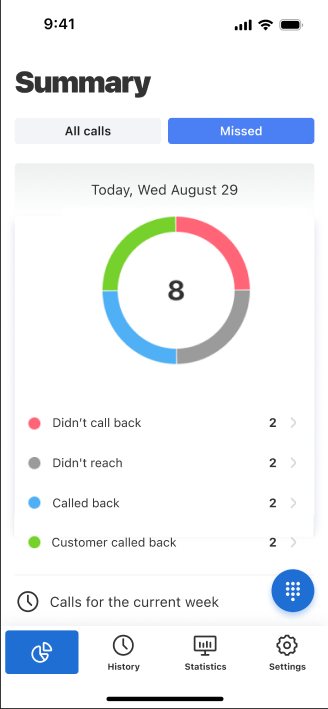
Want more details? From Summary, tap History or Statistics below the chart to explore further features.
How to Search for Calls
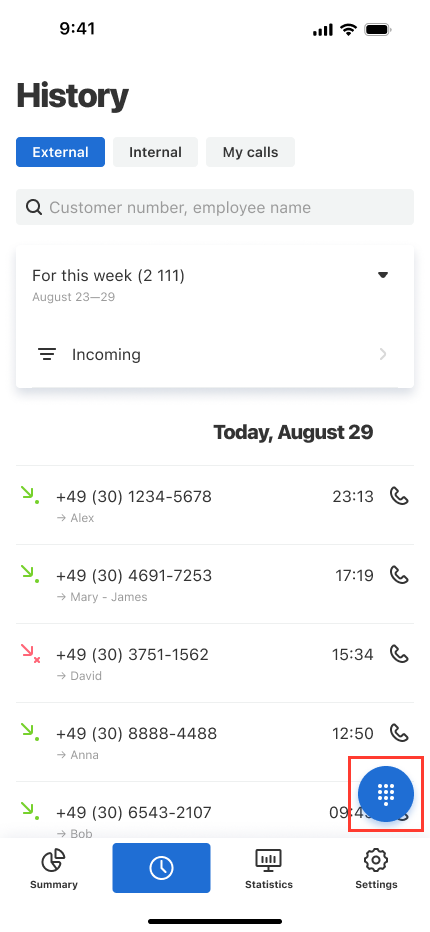
In History, you can track all calls made using Cloud PBX-connected numbers. Use filters to quickly find the calls you need. Simply swipe through call cards to browse — no need to close one to open another.
You can view calls for any time period, for a specific customer, employee, or department, and by call type (incoming, outgoing, missed). By default, only external calls are shown. To view your calls or internal ones, switch tabs at the top.
To find missed calls for a specific period using filters in History:
1. Go to History, select a tab: External, Internal, or My calls.
2. Open Filters, choose Missed, then tap Apply.
History also shows the status of missed calls with labels:
- Customer called back
- Employees Called back
- Didn’t call back
- Didn't reach
Please note
To sort calls by missed-call handling status, go to History — choose External, Internal or My calls — Filters — Missed calls control — select statuses — tap Apply.How to Listen to and Download Call Recordings
To listen to a call recording, find the relevant call in History and tap it. A detailed call card will appear — tap the play button at the bottom to listen.
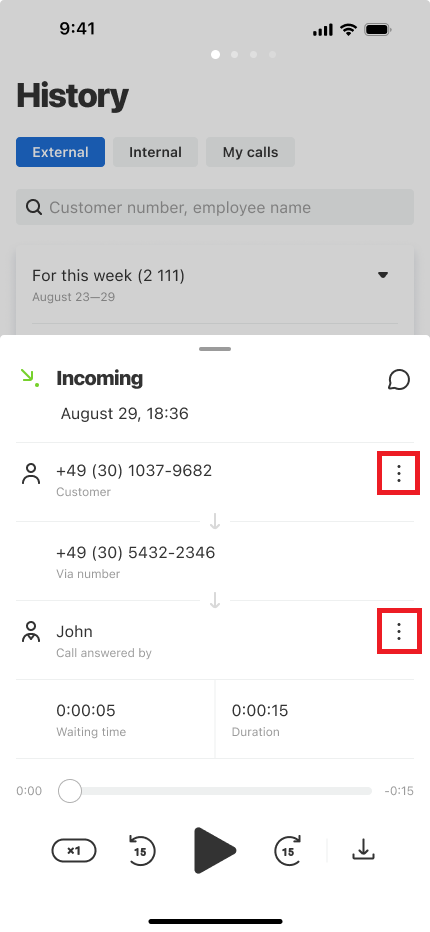
To download a call recording in MP3 format, tap the download icon in the bottom right corner.
To share a call recording, tap the three-dot menu in the top right corner.

How to Quickly Call a Customer Back
You can call a customer back from a call recording in History, from a call card, or from a push notification about a missed call. Let’s take a closer look at each option.
Callback From a Recording in History
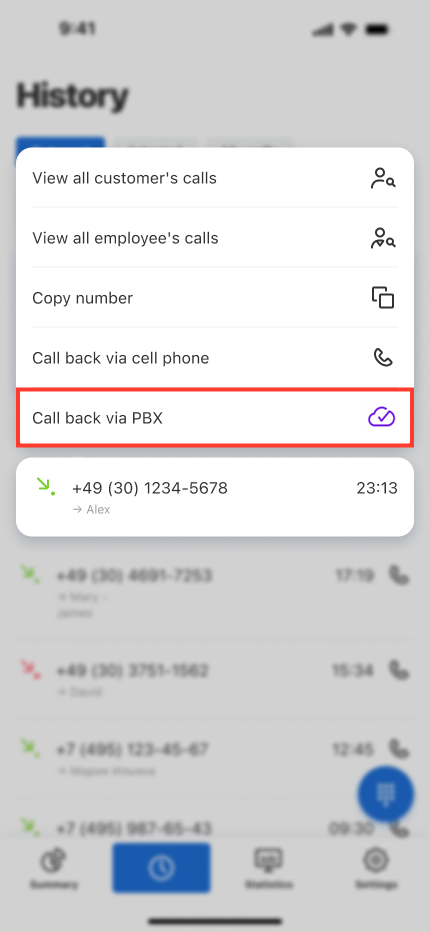
1. In the call history, find the contact you want to call back.
2. Tap the phone icon to the right and choose Call back via PBX in the menu that appears.
Callback from a Call Card
1. Open the detailed call card in History.
2. Tap the three-dot menu in the upper-right corner and select Call back via PBX.
Callback from a Call Card
To call back from a call card, tap the relevant entry in History. In the call card, tap the three dots in the upper-right corner.
In the menu that opens, select Call back via PBX.
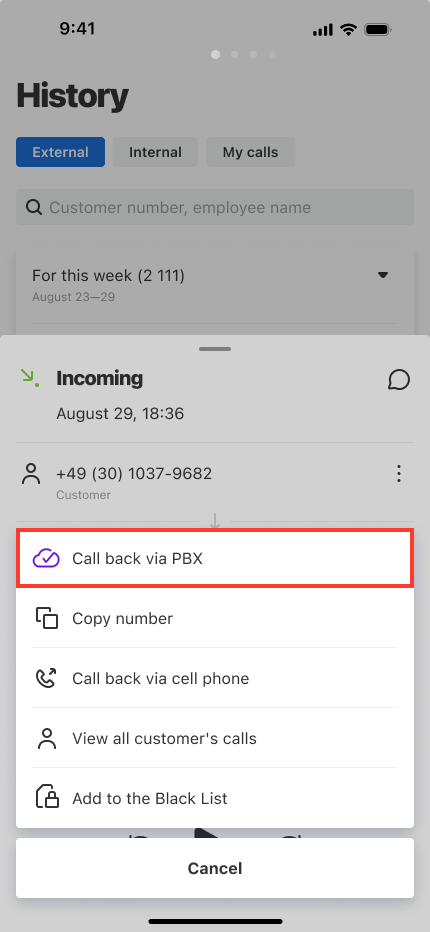
Callback from a Missed Call Push Notification
Cloud PBX administrators can receive push notifications about missed calls and quickly call customers back.
- For iOS: long-pressing the push notification brings up a pop-up menu. To start the call, select Call back. The Open option opens the call card.

- For Android: tap the arrow on the right side of the notification. To start the call immediately, select Call back. The Open option opens the call card.

This will start a call to the customer.
How to Quickly Find a Contact
Contacts is a shared customer database in Cloud PBX available to the entire team. Contacts are synced with the Cloud PBX web interface and Corporate Messenger.
With Contacts, employees see the customer’s name on incoming calls, and supervisors can easily track how their team communicates with key customers. It is also convenient to call customers and colleagues from Contacts.
To open Contacts, tap the book icon in the bottom menu.

For your convenience, contacts are organized into the Customers, Employees, and Phone (contacts from your device) tabs. You can also add frequently used contacts to the Favorites tab marked with a star icon.
To add a contact to Favorites, tap the contact name in the relevant section, then tap the star in the upper-right corner.
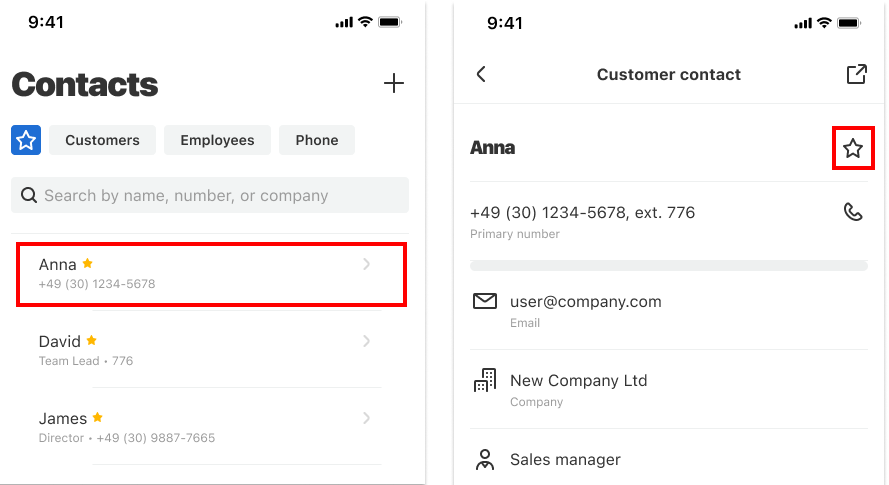
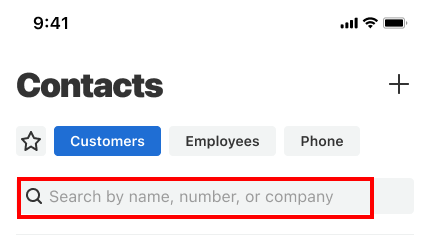
To find a contact by name, phone number, or company name, use the search bar at the top of the screen.
How to Add New Contacts
In the mobile app, you can manually add contacts in two ways: from the call card and in the Contacts section. To add a large number of contacts at once, allow access to your phone’s contacts.
Below is a detailed overview of each method.
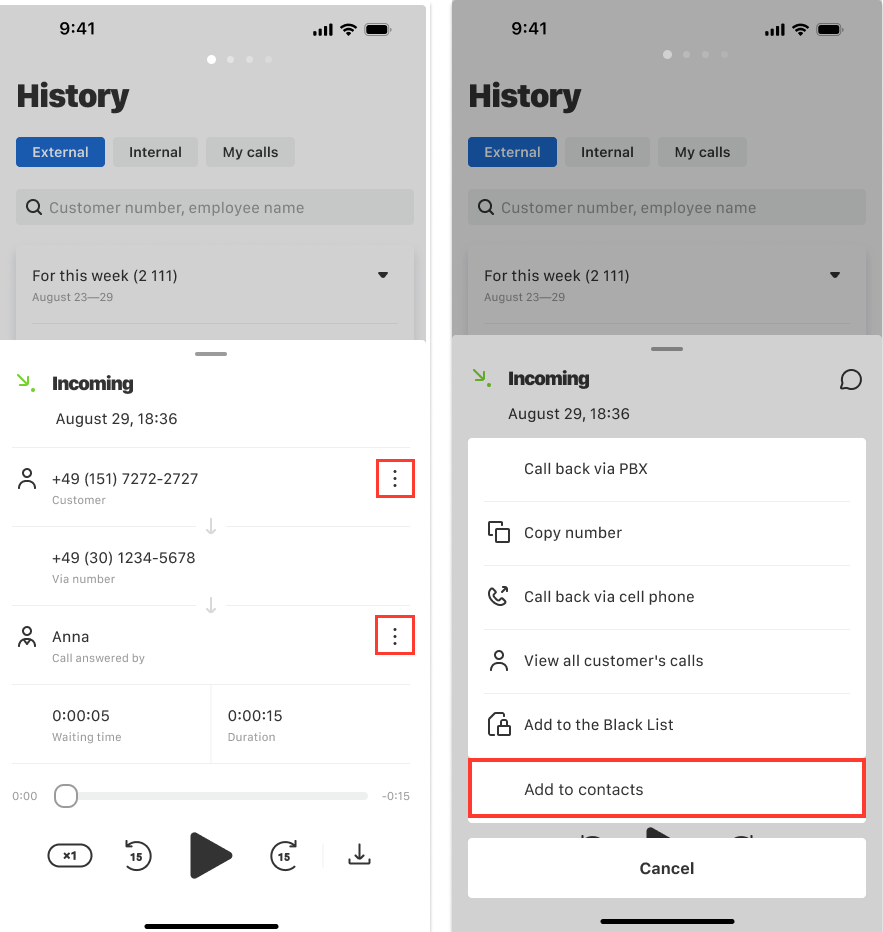
You can add a contact from History in two ways: by long‑pressing a call or from the call card.
Long‑pressing a call will open a quick menu. Select Add to contacts.
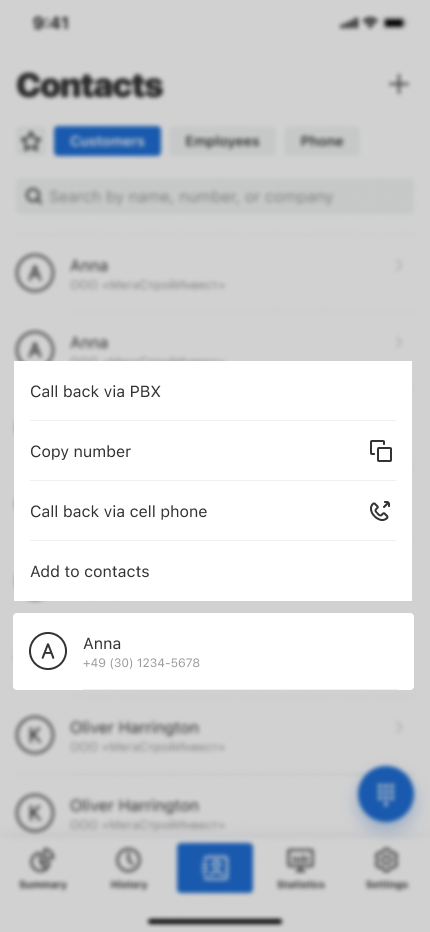
A short tap on a call will open the call card. To add the number to Contacts, tap the three dots in the upper-right corner and select the appropriate option.
Fill in the required fields and tap Save. For more details on how to fill in a contact, about contact types and call card capabilities, see the “Contacts” article.
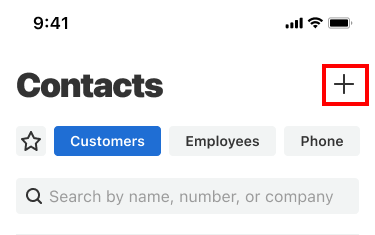
To add a contact that is not in History, go to the Contacts section and tap the plus in the upper right corner.
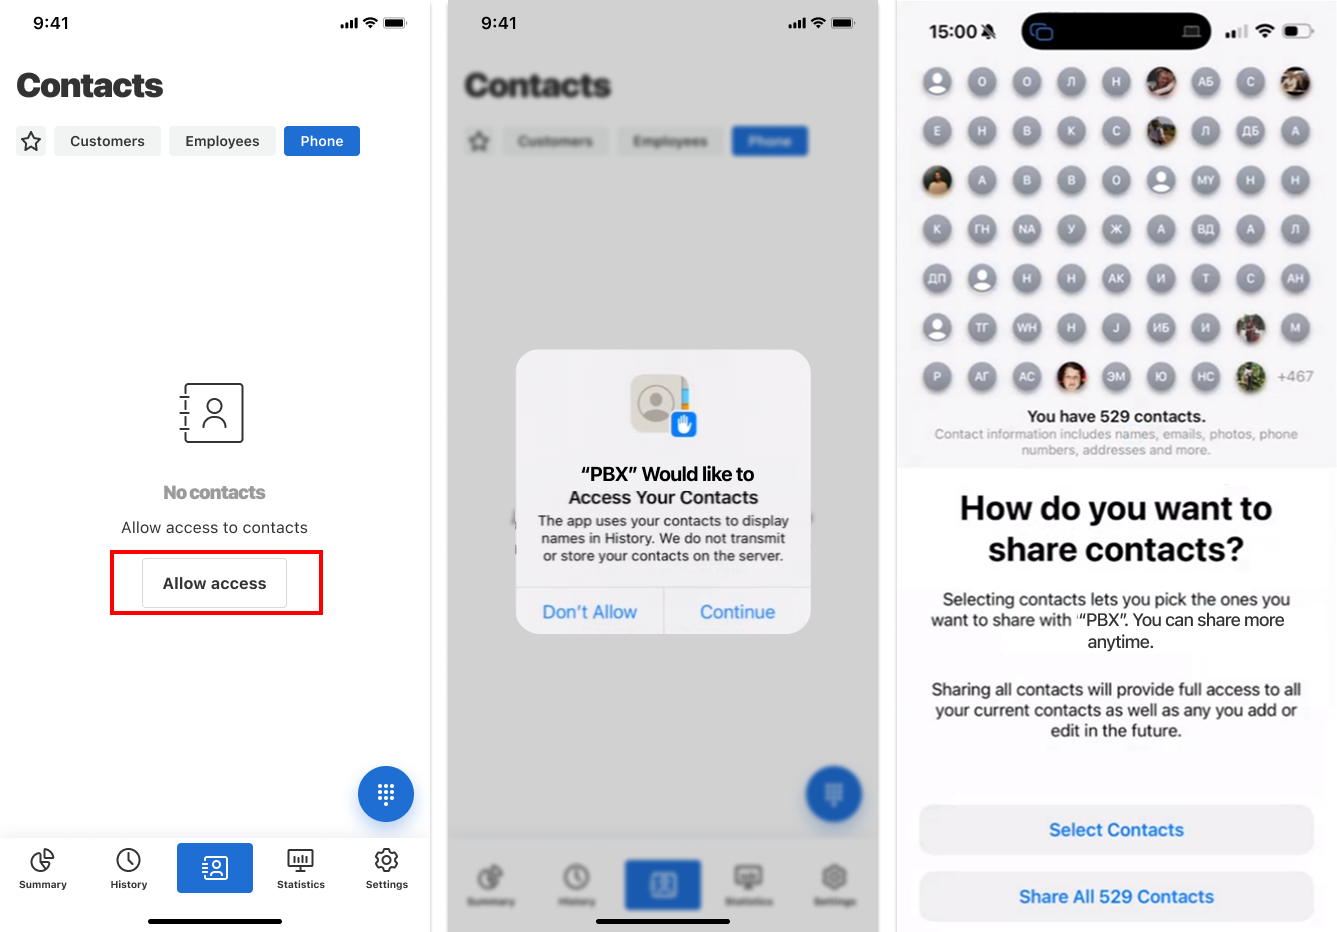
To add contacts from your smartphone, in the Phone tab tap Allow access. The next steps depend on your operating system type:
- On Android, app permissions will open — here you can configure access to viewing all contacts stored on your phone.
- On iOS, tap Continue and then grant access to all contacts or select the contacts that will be displayed in the app.
To add multiple contacts from an xls file, use the Cloud PBX web interface or Corporate Messenger.
How to Review Staff Performance under Statistics
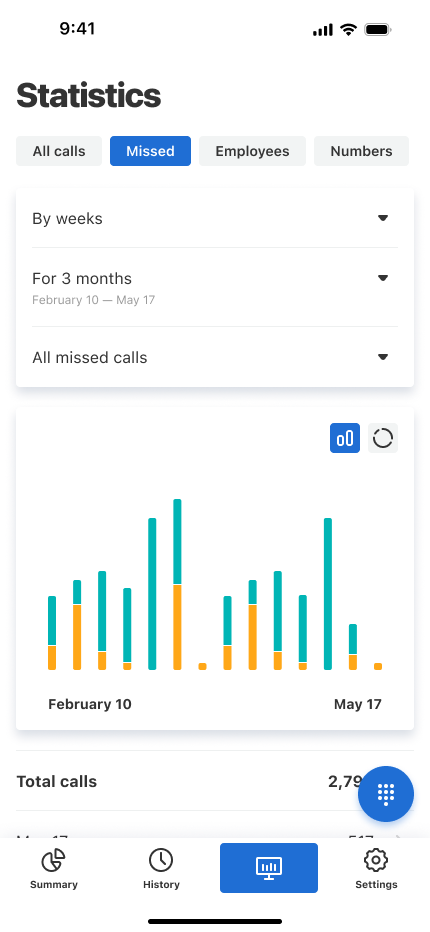
The Statistics section allows you to monitor call trends, evaluate staff performance, and track missed-call handling — all within the mobile app. Reports can be viewed for the year, last 3 months, this week, or last week.
Available report types include:
- All calls — view call trends across the company via tables and charts. Tap any call to view details in History.
- Missed — shows how many missed calls were handled versus left unattended.
- Employees — compare staff by call volume and duration using filters for any period.
- Numbers — view stats for each Cloud PBX number: answered and missed calls, unique callers during the selected period. </panel>
How to Make Calls via Mobile App
Tap the floating action button in the bottom right corner — available in Summary, History, and Statistics — to make or receive calls.

On first use, the app will request permissions needed for calling functionality:
iOS: microphone and notifications. Android: microphone, notifications, contacts, audio recording, call management, call accounts.
Please note
You can toggle calling permissions any time: Settings — Call Management — Enable/disable calls.Configuring Call Forwarding to Other Devices
If you're often away from your desk, choose where you want to receive calls and where incoming calls are routed.
Go to Settings — Personal settings — My profile — Call reception, and select one or more devices:
- desk phone & PC;
- corporate SIM;
- personal mobile.
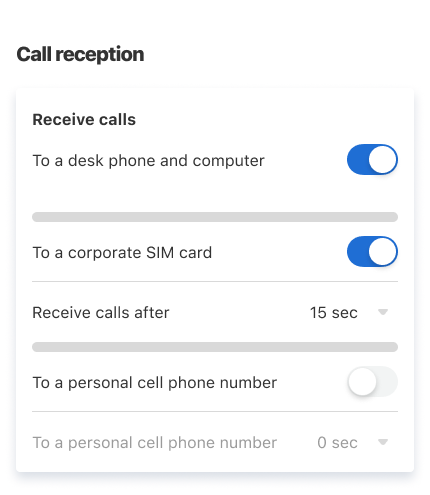
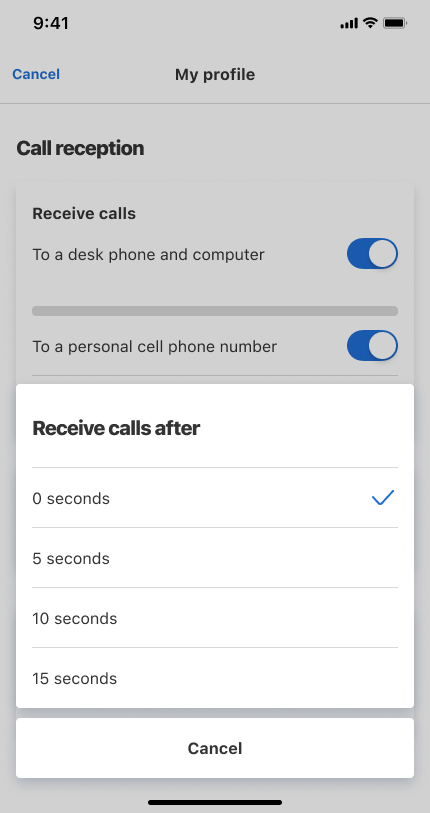
If you're usually at your desk, set a delay so calls go to office devices first, then SIM or mobile. Tap Receive calls after and select a delay.
Using a Second Line
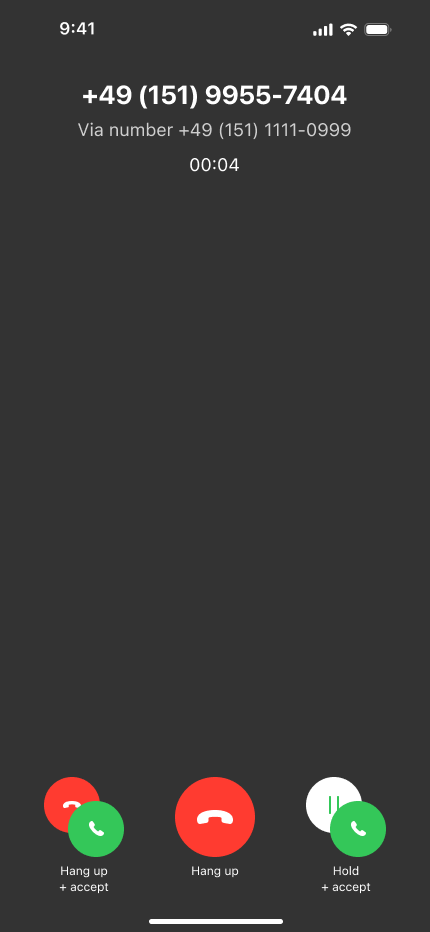
If someone calls an employee while they are already on a call, the call will not be missed — it will go to the second line. The employee will hear short beeps, and the screen will show options to decline the call on the second line or answer it. Whatever the employee chooses, their current call will not be interrupted. If the manager plans to answer the call on the second line, it is better to warn the current call participant in advance that the call will be put on hold.
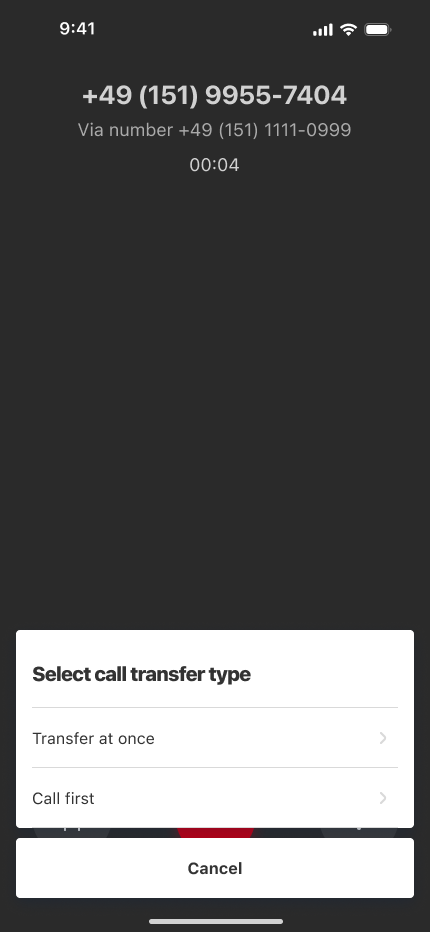
How to Transfer a Call to a Colleague or Department
Calls can be transferred in two ways:
- Warm transfer: Put the customer on hold, call the colleague to confirm availability, then complete the transfer.
- Cold transfer: Transfer the call immediately.
Transfers can be made to internal Cloud PBX users or external numbers.
How to Configure Outgoing Numbers
You can select which numbers customers see when receiving calls from your staff. For details, see the article on Changing Numbers for Outgoing Calls (Caller ID) . In the mobile app, you can configure:
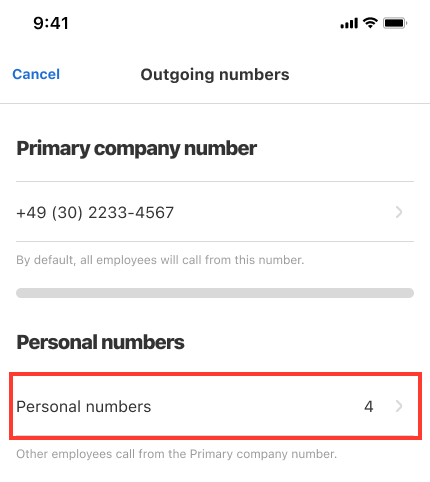
- Primary company number — used by staff or departments without personal/region numbers.
- Personal numbers — assigned to specific employees or departments for outgoing calls.
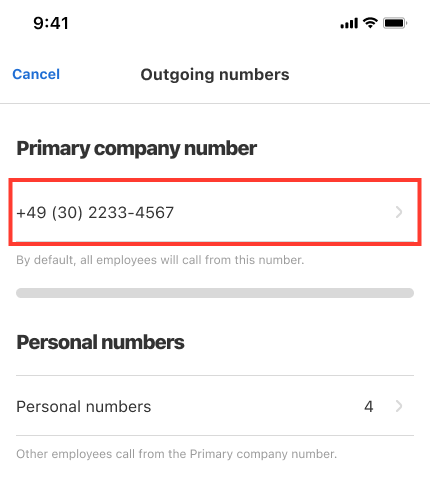
Adding Primary Company Number
1. Go to Settings — Cloud PBX Settings — Advanced Settings — General — Outgoing Numbers — Primary Company Number.
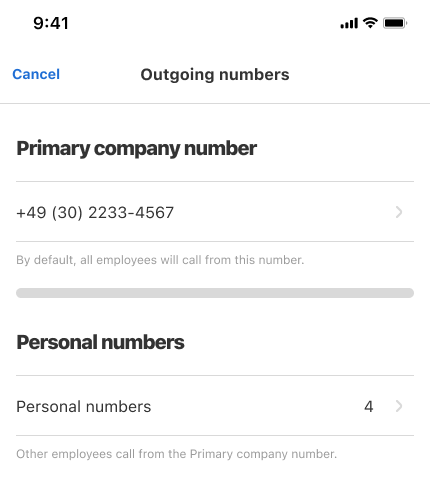
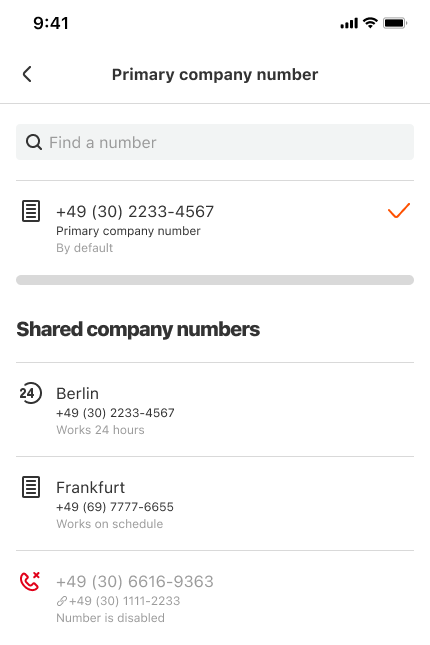
2. Tap the number to change it.
3. Select the desired number from the list or search by entering digits.
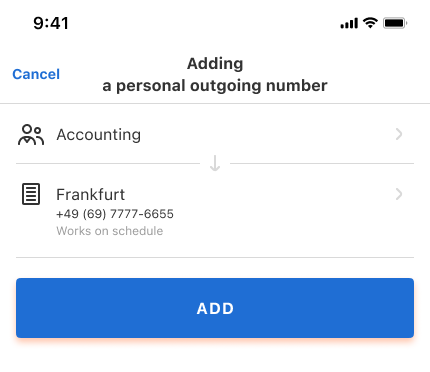
Adding a Personal Number for an Employee or Department
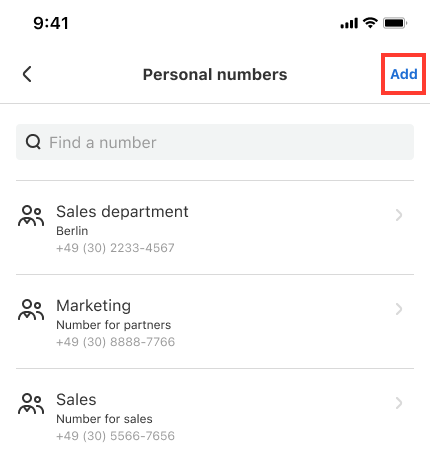
1. Go to Settings — Cloud PBX Settings — Advanced Settings — General — Outgoing Numbers — Personal Numbers.
2. Tap Personal Numbers.
3. Tap Add to select a number for a user or department.
4. Select the employee or department.
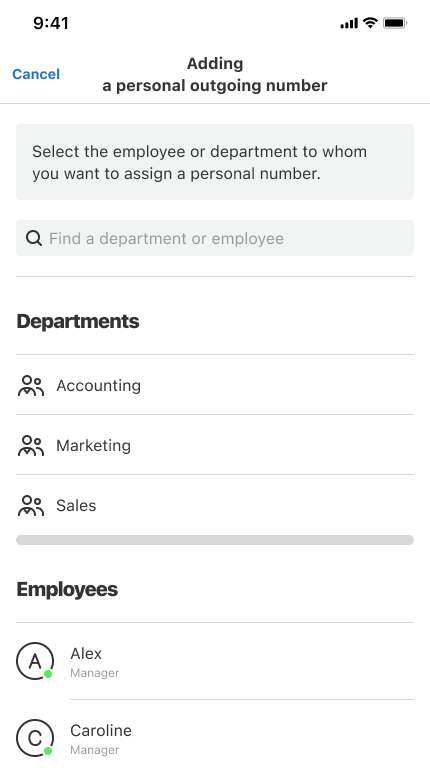
5. Choose the number from the list or search by entering digits.
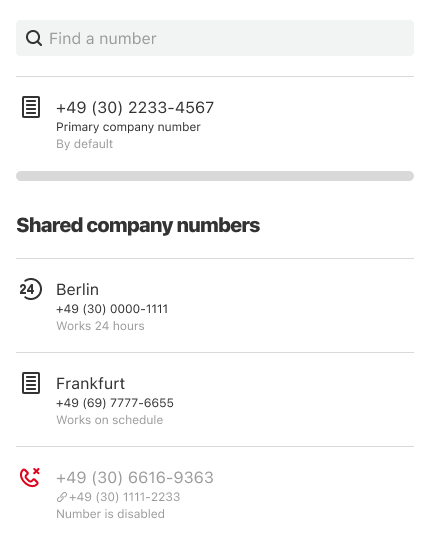
6. Tap Add.
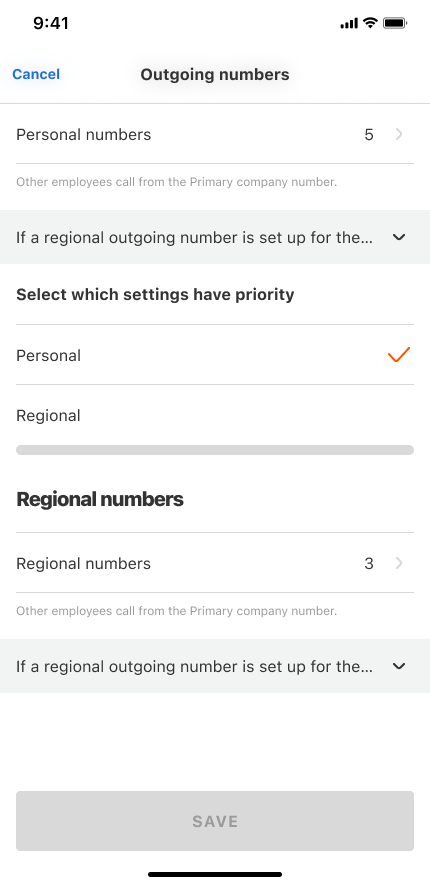
Adjusting Priority Between Personal and Regional Numbers
If your customers from other regions call employees’ personal numbers, situations like this can arise: the customer saves the manager’s number, but then the manager calls them from an unfamiliar (regional outgoing) number — the customer thinks it’s a spam call and hangs up. To prevent this, you can change the priority for selecting the outgoing caller ID — so if the employee has a personal outgoing number, that one will show up on the customer’s phone.
Go to Settings — Cloud PBX Settings — Advanced Settings — General — Outgoing Numbers and adjust priority.
How to Configure Incoming Call Forwarding
Ensure staff never miss incoming calls during delays, off-hours, or absences by setting call forwarding in the mobile app.
Options include forwarding when:
- calls aren’t answered promptly;
- it's outside working hours;
- the employee is on leave or unavailable.
Forwarding when Calls are not Answered for a Long Time
1. Go to Settings — Personal Settings — My Profile — If you don't answer.
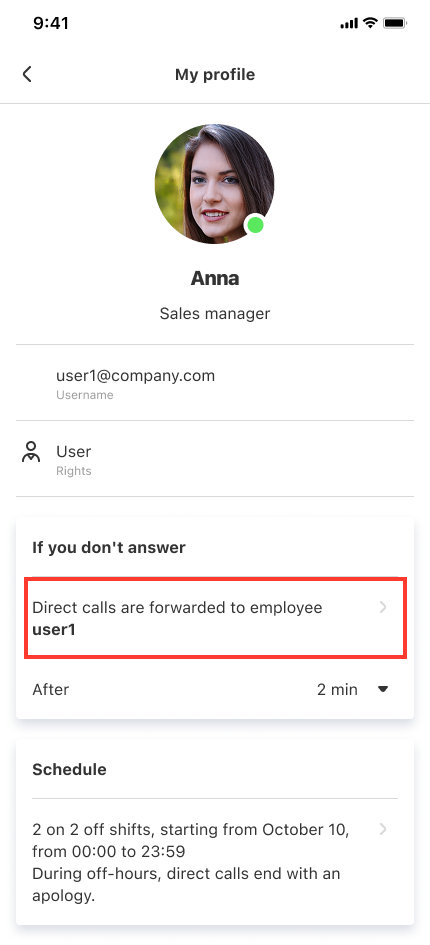
2. Choose what happens if a call isn't answered:
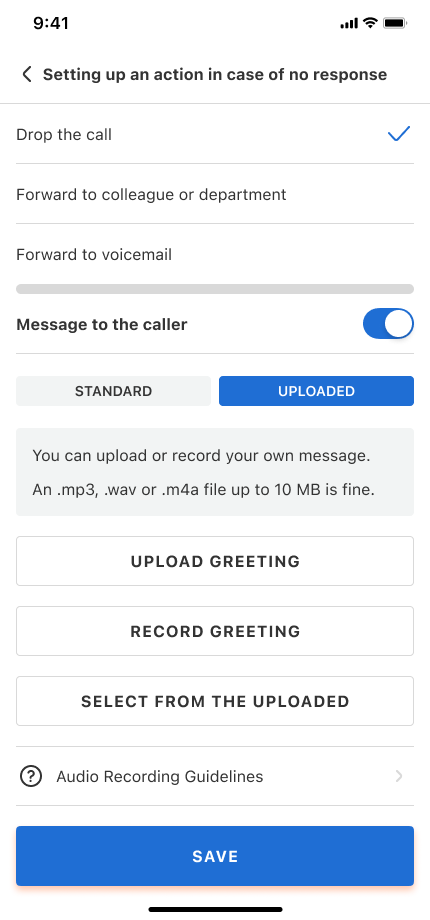
- Drop the call — with a standard notification or short ringback.
- Forward to colleague or department — recommended if someone else can take the call. In this case, select the recipient.

- Forward to voicemail — ensure no call is lost.
You can enable a custom message: tap Greeting to callers.
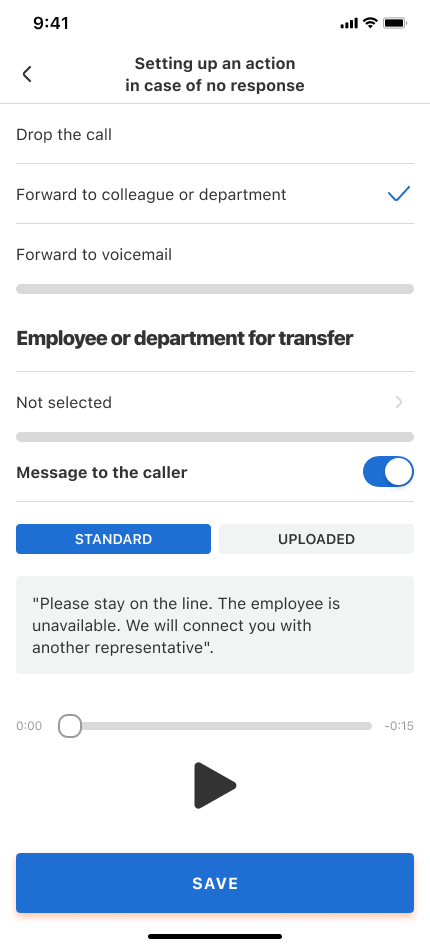
By default, Cloud PBX will play a standard notification to the caller that the manager is not available and that another specialist will assist them. However, you can upload or create your own notification, for example, specifying exactly who the call will be redirected to. This prepares the customer for the fact that they will be speaking with someone other than the person they intended to talk to. To create your own message, click on Uploaded. You can then:
- Upload greeting, using your own audio file.
- Record greeting using text-to-speech.
- Select from the uploaded audio files.
Forwarding Outside Working Hours
Flexible schedule settings for employees let you set up call handling for business and off-hours once, and you won’t need to worry about it again until the employee’s work schedule is changed.
1. Go to Settings — Personal Settings — My Profile — Work Schedule. Select your schedule (e.g., 5/2).
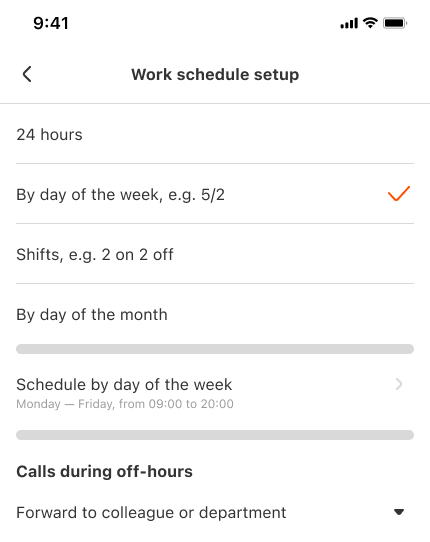
2. Set call handling in the Off‑hours calls block as described in the Forwarding when Calls are not Answered for a Long Time section above.
Forwarding Incoming Calls During Leave or Absence
Ensure calls still reach the company during an employee’s vacation or sick leave.
1. Set dates or enable indefinitely: Settings — Personal Settings — My Profile — Vacation or absence. You can set vacation dates or keep call forwarding active until you manually turn it off.
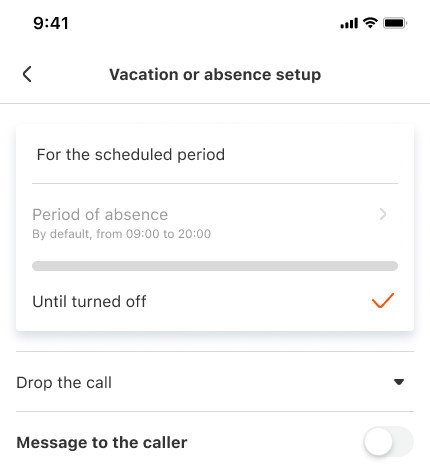
2. Configure handling incoming calls as described in the Forwarding when Calls are not Answered for a Long Time section above.
How to Set Up Cloud PBX in the Mobile App
Control your Cloud PBX on the go. The app offers Personal Settings and Cloud PBX Settings.
Personal Settings let you:
- edit your profile — name, mobile number, call forwarding;
- choose theme: light, dark, or system default;
- pick the UI language;
- sync call history with your contacts;
- enable push notifications for missed calls
- view and configure access permissions for the Cloud PBX app.
Cloud PBX Settings let you:
- add/remove users and edit their details;
- view staff availability and active call capability;
- add, configure, and remove departments;
- set operating hours and general call routes;
- manage SIM card usage (company-wide vs personal) and disable SIMs;
- view CRM integrations;
- enable call recording and select which users to record;
- manage the blacklist.
Other History Features
In History, you can also:
- add unwanted contacts to the blacklist;
- mark calls as favorites to revisit later;
- add notes to calls so you don’t miss important details;