Call Forwarding
Call Forwarding to Employee’s Cell Phones
Even the most diligent employee is not always at their desk. They may not be able to answer a call on their SIP phone or softphone, but a cell phone is always with them. So you can enable the Call Forwarding to Personal Cell Phone Number option. You can set it up in two ways:
- Go to the Cloud PBX interface.
- Dial a code on your SIP phone.
Let's look at each way in more detail.
Configuration in the Cloud PBX Interface
1. Navigate to the Employees section. If an employee’s account with the number, to which you want to forward to, has already been created in Cloud PBX, click the employee's name. If not, click Add employee.

Moreover, employees with User or Limited user access levels can also set up call forwarding. They need to click their name in the top right corner of the web interface.

2. In the employee settings, scroll down to the Forwarding section. Choose where the call will be sent — only to the cell phone, to the computer and the desk phone, or to all employee’s devices at once.
Also, if an employee is mostly present at the desk and can immediately answer from a desk phone or computer, we recommend setting a delay before forwarding the call to the cell phone. So, the call will first ring on the office devices, and only then (for example, after 5 seconds), it will be forwarded to the cell phone.

Setup via SIP Phone
If you need to quickly enable, disable or modify call forwarding to your cell phone without accessing the Cloud PBX web interface, you can do it using your phone. To set up call forwarding, press an asterisk on your phone keypad and enter a special code (star code).
To enable call forwarding with star codes, please contact support. After that you can configure call forwarding yourself in a few simple steps.
1. Provide a cell phone number for call forwarding.
Dial *74<phone number> and press the call button.
Specify the phone number in the following formats:
- 49ХХХХХХХХХ
- +49ХХХХХХХХХХ
If everything has been done correctly, you will hear a message confirming the successful setup of the number for the forwarding. Otherwise, Cloud PBX will notify you of an error.
If you have already entered the number for the forwarding through the web interface, skip this step.
2. Enable call forwarding to the specified number.
To enable call forwarding to the number specified in step 1, dial *72 and press the call button.
If everything has been done correctly, you will hear a message confirming the successful setup of the forwarding. Otherwise, Сloud PBX will notify you of an error.
Please note
When you enable call forwarding, calls will be directed only to the cell phone.3. Disable forwarding.
When you need to disable call forwarding to the cell phone, dial *73 on your phone and press the call button.
If everything has been done correctly, you will hear a message confirming the successful disabling of the forwarding.
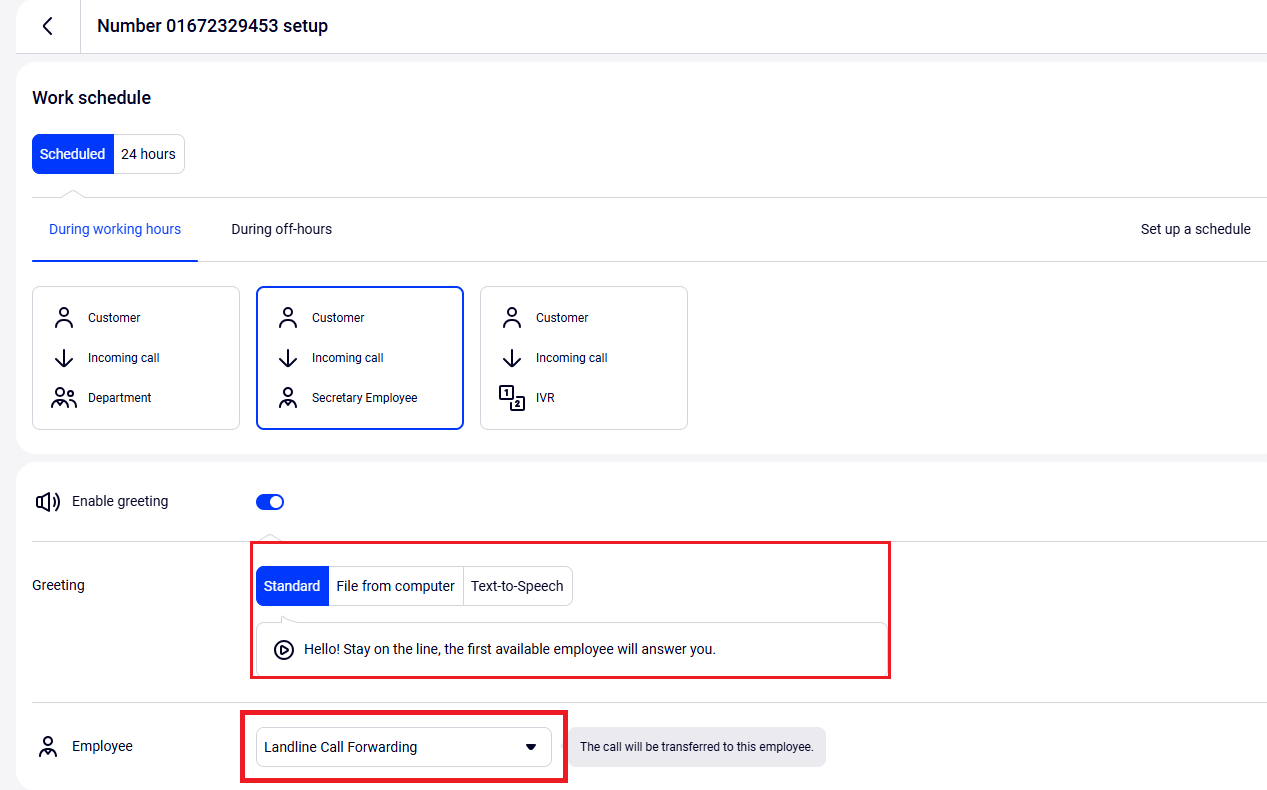
Call Forwarding From Landline Numbers
As a rule, private customers call from cell phones, while calls from landline numbers more often come from other companies and city services. If you want a secretary to answer calls from landline numbers, you can create an employee in Cloud PBX with a specified number for call forwarding. You can name them accordingly — “Landline Call Forwarding”.

Then in the Numbers section select the required work schedule and set up the call distribution to the secretary employee.
Forwarding Direct Calls to a Colleague or Department
PBX can temporarily forward direct calls to an employee to their colleagues when:
- The employee has off-hours. For this they must havepersonal schedule set up.
- The employee is on vacation or sick leave. For this they must havethe absence period set up in Cloud PBX.
- The employee does not take a direct call for a long time. In this case Cloud PBX rejects or automatically forwards the call to the selected employee or department. In this case you can specify the response waiting period before forwarding or dropping.
For more details see the Forwarding of Direct Calls With a Long Response Time article.